
Build AI Agents with n8n in 2026 Step by Step Guide
The world of automation has changed dramatically in just a few years. Where once building custom digital assistants required teams of developers, today, thanks to platforms like n8n and remarkable progress in artificial intelligence, you can set up your own AI agent with almost no code. You want to save time, cut back on repetitive work, and maybe even let your business operate in ways you never thought possible? If yes, you’re in the right spot. In this detailed guide, I’m sharing my real-world, hands-on process for building robust AI agents with n8n, entirely in 2026 style. Beginners or seasoned techies alike—by the end, you’ll have everything laid out to make clever automations your new normal.
Why Build AI Agents with n8n?
If you’re anything like me, you’ve probably spent hours every week checking the same websites, sending emails, collecting data, or updating reports. I can’t count how many coffee breaks have vanished just copying and pasting bits of information from one place to another. But here’s the good news: AI agents in n8n now handle all these repeatable tasks easily—even “thinking” for themselves, making decisions, and delivering exactly what you want, in the format you need.
- Collect up-to-the-minute data from financial or industry sources
- Automate research and summarise results
- Create regular briefings or digests
- Send formatted notifications or emails
- Provide basic customer interactions—all without you lifting a finger each day
I found that, with n8n, I could teach an agent to fetch market summaries and quotes, shape them into tidy newsletters, and mail them directly to my inbox every week—literally changing the way Monday mornings start for me. The process is not just about saving time; it’s about building reliable routines that let you focus on genuinely valuable work.
Understanding n8n: Self-Hosting vs. Cloud
Choices: Cloud or Self-Host?
When it comes to n8n, you can run your automations in two main ways:
- n8n Cloud: The official, hosted online version by the creators. Easy to use for simple automations and learning the basics.
- Self-Hosted: You run n8n on your very own virtual private server (VPS) or local machine.
Here’s what I realised after some experimentation. The cloud option is absolutely fine for testing ideas and lightweight jobs. But if you want your agents to run real business processes—where multiple steps, frequent API calls, and heavy lifting become the norm—you’ll quickly run into usage caps, execution limits, and (let’s be honest) rising costs. The more your agent works, the more you’ll pay, especially if you’re scaling up.
Self-hosting puts the control squarely in your hands. With your own VPS:
- No execution limits or API bottlenecks
- Better privacy and security
- Total control over your workflow, speed, and stability
- Predictable, usually much lower ongoing costs
Plus, you’re never stuck waiting for someone else’s server to finish with someone else’s job. My own instance became lightning fast, with no mysterious slowdowns and the joy of fully private data—something you can’t put a price on.
Getting Started: How I Set Up n8n on a VPS
Step 1: Choose Your VPS Platform
You don’t need to be a server wizard to self-host n8n. I went for a trusted VPS provider with a one-click n8n installer—no need for server racks or command-line marathon sessions. For the sweet spot of price and reliability, I found the “KVM2” plan fit my needs brilliantly, giving plenty of horsepower for single or a handful of agents.
- Select your plan (aim for something with at least 2GB RAM and a modern CPU)
- Pick your billing period
- Choose the server closest to you for better response times
- When prompted, choose n8n as your starting application (with or without sample workflows)
Within minutes of paying, my virtual machine was ready. I hopped into the management dashboard, and—boom!—n8n was up, waiting for my first workflow. Self-hosted, no execution limits, and genuinely mine.
Building Your First Real AI Agent in n8n
Here’s how I built a weekly email agent that fetches current S&P 500 data, pulls an inspiring quote, wraps it all nicely, and delivers an eye-catching email every Sunday at noon. This is just my flavour—you can bend the idea any which way you like.
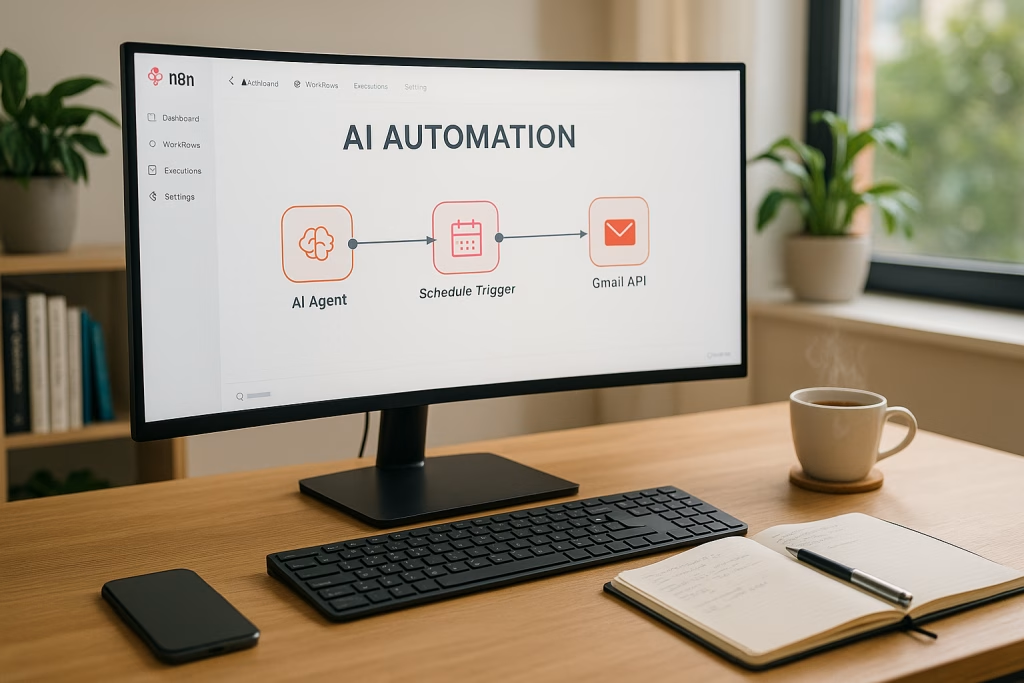
Step 2: Create a Scheduled Workflow
Upon entering n8n’s workflow designer, you see a clean canvas. I clicked the “+” to add nodes, and everything started from a trigger. For a weekly email, that trigger was a Schedule/Interval node:
- Interval: Weeks
- Frequency: Every 1 week
- Day: Sunday
- Hour: 12:00 (midday, so I get my update with my lunch!)
That became the rooted starting point for the entire workflow.
Step 3: Add the AI Agent Node
The real magic begins with the AI Agent node. It’s where you plug in the brain, memory, and tools for your agent.
- Click “+” and choose the AI Agent node under the “AI” category
- This is where the integrations happen—think of this as your digital “control room”
Step 4: Connect Your AI Model (OpenAI Example)
Inside the agent, you pick your Large Language Model. I went for a Chat Model powered by OpenAI for this guide, but you can swap them for alternatives as you wish.
- Select OpenAI as your chat provider
- You’ll need an API key
- Register or sign in at platform.openai.com
- Create an API key, give it a name, and save that secret somewhere safe
- Paste the key into n8n’s credential section for OpenAI
- Top up your OpenAI account so queries don’t fail
Once saved, your model should show as “available”—a sigh of relief every time I see that confirmation!
Step 5: Give Your Agent a Memory
No one likes repeating themselves, and AI is no different. If an agent can’t remember your last chat or the data it just handled, you’ll end up frustrated—or worse, sending nonsense to your subscribers. In my setup:
- Select the “Simple Memory” option in the agent node
- This lets your agent track session-based context
The good bit? You can expand this with databases, Notion, or other memory stores later, but starting simple proved more than enough for regular briefings.
Step 6: Add Tools to Your Agent (e.g., SERP API for Google)
A model without tools is like a university graduate with nowhere to go: smart but stuck. With SERP API (or similar), your agent can search the web for updates or fetch quotes.
- Add the SERP API tool inside your agent’s setup
- Register at serpapi.com, get your API key, and enter it in n8n
- This ability gives your agent the real-world reach—fetching current stock news, for example, just as easily as I’d do it myself
Step 7: Test Your Agent Before Scheduling
I always double-check things before going “live.” I temporarily created a second trigger: Chat Message Received. I hooked it to the AI Agent and sent a test instruction like, “Send the latest S&P 500 news and a historical quote.”
The resulting output told me in seconds if everything was firing correctly—credentials validated, tools accessible, and the agent able to “think” through an entire sequence.
Step 8: Write Your Agent’s Job Description (Prompting)
Here’s the fun bit: actually telling your agent what to do. I switched the prompt source to “define below” and in the User Message box, wrote:
You are a weekly brief agent. You take a quote of the week and the current S&P 500 overview and format them into a reliable, short weekly briefing. Find: one quote of the week, a one-sentence S&P 500 summary, and a reader takeaway. Use the current date.
N8n’s schema input made this even easier—just drag “readable date” directly into your prompt, so each week is stamped with the real date, no manual tweaking required. I finished the message with:
Format it as a mini email newsletter in Markdown.
Step 9: Update Session Memory for Production
Before letting your agent run unsupervised, make sure it’s not blending test messages and scheduled outputs. Update the session identifier in the memory node, then fire off the workflow again.
Typically, the markdown output at this point is a bit rough—a little like receiving a draft email from a rushed assistant. That’s totally normal. We’ll pretty it up next.
Converting Markdown to HTML: Making Things Look Right
Most folks don’t love reading raw Markdown, and let’s face it, email clients are happiest with HTML. I added a “Markdown to HTML” node from the data transformation tools, linking the AI Agent’s output as input.
The result is functionally fine, if bland. If you want your newsletter to look even half as good as the ones you get from brand heavyweights, you’ll want to jazz it up with consistent styles and tidy formatting. So I handed the content to AI for a quick style fix.
Adding One Last AI Styling Node
To get that professional touch, I dropped in another OpenAI “messaging” node, set its role to system, and prompted:
“Make the HTML below look better using inline CSS styling for an email newsletter. Keep it pretty, but simple. Output the styled HTML only.”
When I plugged the previous step’s HTML as the user input, the output looked far better: margins, headers, highlight sections—all much more like a real company update and far less like someone’s tech test.
Sending Your Beautiful Email via Gmail
Google Cloud Setup: Step by Step
For your agent to email you (or recipients) automatically, n8n needs to connect securely to Gmail. Here’s what I did:
- Create a Google Cloud Project: Navigate to Google Cloud Console, create a project with a memorable name for later use.
- Enable Gmail API: Find “Enable APIs and Services,” search for Gmail, and turn it on for your project. Without this, you’re dead in the water.
- Configure OAuth Consent Screen: Fill in app info and support email; pick “External” for personal Gmail, “Internal” for Workspace accounts.
Generate Your Gmail Credentials
- Go to “Credentials,” then create a new OAuth client.
- Set application type to “Web application.”
- Input redirect URI copied from n8n’s Gmail credential setup.
- Save, copy Client ID and Client Secret, and paste them into n8n as shown.
- Before logging in, publish the app to avoid needing to reauthenticate every 7 days.
- Hit “Sign in with Google” in n8n, authorise all warnings and scopes, and you’re good to go.
Composing and Sending Your Automated Email
- Enter your recipient’s email (I used my own for tests).
- Set a dynamic subject, e.g., “S&P Brief – {{date}}.”
- Paste the styled HTML from the AI node as the message body.
Now, I just hit “Execute Workflow” and five seconds later, my inbox sang with a crisp, perfectly formatted update. I admit, getting the first real email always feels a tiny bit magical.
Setting Your AI Agent Free: Active Mode and Hands-Off Automation
So your workflow runs like a dream. Now, turn it loose. Save your project, and flick the switch to Active mode in n8n. Your agent’s now working in the background, fetching, formatting, and sending out those weekly reports bang on time—no action needed from you.
Suddenly, your Sunday email “just happens.” That’s when I realised the real win: not only did I save time, but I built a mini digital colleague—reliable, unfailingly on schedule, and always delivering in my preferred style.
Expanding Your Agents: New Use Cases Just a Node Away
Once you nail the process for a weekly market briefing, you can remix this workflow for almost anything:
- Daily news round-ups from specific websites or feeds
- CRM deal overviews and pipeline changes (sent each morning to your team)
- Social media sentiment digests
- Internal performance snapshots for leadership
- Trigger alerts for important business KPIs—from any data source you like
- Advanced: Automated research (your agent reads dozens of articles and posts a summary in your corporate Slack)
Each one of these flows is just a twist on your initial template: swap out your triggers, prompts, and connections, and let n8n take care of the rest. My own automations range from simple daily weather emails to complex, multi-step content pipelines where an agent preps research, another organises it, and a final agent drafts an executive summary.
Why Self-Hosted n8n Future-Proofs Your Automations
What made the whole experience for me was realising how much self-hosted n8n lets you break free from shackles:
- No workflow nor concurrency limits. You can build a whole orchestra of agents.
- Privacy. With sensitive business data, trusting a third party is a leap—a self-host keeps things safe and confidential.
- Speed and stability. Your tasks run when you want, as quickly as your server allows, without crowds clogging a shared cloud.
- Cost-effectiveness. Plan once, pay fixed rates, and run as many jobs as you need.
Self-hosting opened doors to automations I only dreamt of five years ago—now, scaling up doesn’t mean near-instant invoice shock. And with n8n’s open architecture, I can plug in virtually any tool, from Google to proprietary APIs, building tailored automations for every corner of my business life.
Troubleshooting Common Automation Pitfalls in n8n
Let’s be honest, nothing’s perfect. A few tidbits from my own missteps and their fixes:
- API keys don’t connect? Double-check scopes and permissions in the third-party dashboard; most failures stem from tiny copy-paste errors or forgetting to activate billing.
- Emails get rejected by Gmail? Ensure your app is published in Google Cloud and all required scopes are selected during consent.
- Output formatting looks jumbled? Experiment with prompt instructions; AI can be a literal thinker—details about styles and formatting always help it behave.
- Running slow? Bump up your VPS specs or tune agent step intervals to spread heavy processes over time.
Almost every hurdle has a solution, but joining forums or n8n community sites saved me loads of head-scratching too.
Tips for Customising Your AI Agents in n8n
- Put your “job description” prompt at the heart of the workflow—be as specific and contextual as possible.
- Don’t be afraid to add logic nodes. Branches, filters, and merges can transform simple agents into powerful, context-aware assistants.
- Use environment variables for secrets. Never hard-code API keys; set them securely at the OS or n8n instance level.
- Keep clean, modular workflows. It’s tempting to build sprawling diagrams, but breaking things into linked sub-workflows makes editing (and bug-chasing!) a breeze.
- Schedule regular reviews. My agents are clever, but markets, APIs, and news sites change often. A monthly glance at logs keeps everything ticking sweetly.
Final Thoughts: Your Invisible Digital Team Awaits
If you’re after a smarter way of working, n8n with AI agents genuinely delivers. My own journey began with a simple desire not to check the markets manually every week, and now I’ve built a small digital fleet handling everything from customer follow-ups to boardroom-ready analytics reports.
With each new agent, you add another hand to your “invisible team”—one that works full-speed while you sleep, jog, or simply settle in for a quiet cuppa. The biggest difference? You decide how they behave, how often they work, and what results land in your inbox. No more being at the mercy of online platform limits or random downtime that always strikes on the busiest day.
So, grab your VPS, spin up n8n, and begin designing a workflow or five. Trust me, once you’ve built your first AI agent, you’ll wish you’d begun years ago. And if you fancy a bit of friendly competition—see if you can make an agent more efficient (or cheerful in its summaries) than mine. I look forward to hearing how your office changes when your clever automations start “clocking in.”
Ready to take control? Self-host n8n, make your digital dreams a reality, and free up hours of your week—one agent at a time.